
The last two posts have explored customizing VS Code to improve the blogging experience, but they still haven’t covered what to do about the last pain point: selecting tags and categories for the posts. That may not sound like much, but I have a challenge using them in Hugo.
Each tag or category has a file that creates a landing page for all of the related posts(categories/{category}/_index.md). If I mistype a tag or category name Hugo will automatically create a new page during the publish process. The search engines then index that page, requiring time to clean up those links. Worst, the post will also not appear in the proper place. For example, it may be in a new Category DevOops instead of DevOps, so it won’t be available in the right RSS feed.
Not that it has ever happened to me. 😇
To avoid this, I reviewed the list of tags and categories for each post I created to ensure it is valid. If I needed to add a new tag or category, I create the metadata file for the landing page correctly. While a task could automate finding missing tags and categories, aligning with the list was initially a manual process. A custom task helped, but it still required reviewing the tree of folders if I wanted to know the available options.
I decided that my ideal experience would be a way to select the tags and categories from a checkbox list. As I select those items, the metadata in my post would be updated. If there was a category or tag that didn’t exist, it would be highlighted so I could either correct it or quickly create the metadata file for the landing page. I also wanted a way to quickly jump to the metadata in case I wanted to edit the content. Instead of reviewing the available options, I would simply click to select them.
Similar to the previous post, the solution is to use a custom extension. Unlike the last post, this will require a custom graphical interface. For that, we need to take advantage of Webviews. A Webview is a custom panel for VS Code that displays HTML content and can interact with the user. The end result looks like this (docked in the explorer sidebar):
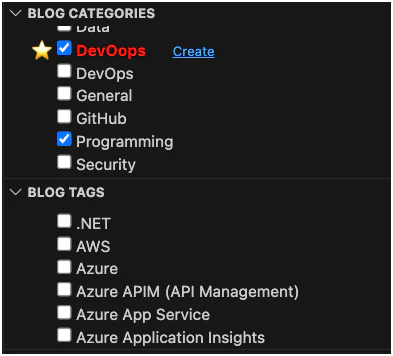
Selecting tags and categories
To make this extension work, it needed a few things:
- Code for listing all of the available tags and categories
- Read the available tags and categories from the current project.
- Watch for changes in the tag/category folders to avoid polling or re-reading the filesystem.
- Create new metadata files for a tag or category
- Webview panels for tags and categories
- Display my custom GUI so I can select values
- Invoke the extension to update the metadata for the current document
- Invoke the code required to create a new tag or category
The first step for me was to create some code that could manage the tags and categories. Since the list is small, I wanted to cache it in memory and update the cache if the files changed. To find the files, I used the findFiles method to discover all of the metadata files (_index.md) that are in the categories or tags folders.
The code looks similar to this:
 1const files = await vscode.workspace.findFiles(`**/categories/*/_index.md`);
 2if (!files || files.length === 0) {
 3    vscode.window.showErrorMessage(`No files found in "**/categories/*/_index.md"`);
 4}
 5else {
 6  for (const file of files) {
 7    const data = await vscode.workspace.fs.readFile(file);
 8    const content = Buffer.from(data).toString('utf8');
 9    // Parse the content to retrieve the YAML metadata
10    // See the code in the last post ...
11}
One thing I learned from doing this. If you use that search query, it may find no results when the extension first starts. In my case, the paths are static in the workspace, so I could hard code them. I could also improve the discovery process. I chose an easier path. Any time the code tries to read the list, attempt to reload the values if it is empty.
Watching for changes
Once the initial data is available, I want to be notified of changes to those folders. VS Code provides us an API for that: FileSystemWatcher. The file system watcher has a glob syntax that makes it easy to listen to multiple folders with a single watcher and receive notifications for specific types of changes.
The code for creating the watcher looks like this:
 1private getWatcher() {
 2    let watcher: vscode.FileSystemWatcher = vscode.workspace.createFileSystemWatcher(
 3      '**/{categories,tags}/**'
 4    );
 5    watcher.onDidChange(this.onDidChange, this);
 6    watcher.onDidCreate(this.onDidCreate, this);
 7    watcher.onDidDelete(this.onDidDelete, this);
 8
 9    // This is Disposable, so don't forget to register it for cleanup!
10    return watcher;
11}
This creates a file system watcher for any files in the current project that are contained in categories or tags directories. The code is in a class that caches the list of categories (or tags) and updates them when the watcher detects a change. This maintains the list of values, but now we need a way to interact with those values.
Visualizing the values
The final piece of the puzzle is the Webview panel. This will contain the GUI for selecting and creating the tags and categories. For my extension, I want a panel for tags and a second one for categories. Both panels will be displayed in the Explorer sidebar and have identical functionality. The only difference is the data they display.
If you want to understand that process, review the tutorial and sample code. It’s a great way to understand how Webviews work and the code required for a basic view.
From there, I recommend the webview-view-sample. It teaches you how to create a web view provider. This lets you create a view that integrates with the sidebar. It also opens the door to more powerful and configurable Webviews.
Both examples use basic HTML and JavaScript. They also provide an overview of how to send messages between the extension and the Webview. Because Webviews and extensions are executed in a sandbox, they cannot directly communicate. This means that the extension has to send messages through VS Code APIs to update the Webview. Similarly, the Webview must post messages to its host in order to update the extension. These behaviors make the panels interactive.
Creating an interactive experience
In my case, once the Webview panel is created, the extension pushes the list of available tags or categories to it. JavaScript in the Webview listens for this message and uses it to dynamically create checkboxes. Each item in the list includes a include a flag to indicate if it is currently included in the open document’s metadata. If so, it should be shown as selected(checked) in the panel. When the document is saved or updated, an updated list is sent to the Webview.
The Webview code also listens for changes to the checkboxes. As it creates each checkbox, it attaches a handler to the HTML element’s change event listener. When a change is detected, the code gathers a list of the selected values. It then sends this back to the extension. When the extension receives this message, it updates the appropriate metadata in the current document.
The initial code in the webview looked like this:
 1function updateItems(items) {
 2  const ul = document.querySelector('.selection-list');
 3  ul?.replaceChildren();
 4  for (const item of items ?? []) {
 5    const li = document.createElement('li');
 6
 7    const input = document.createElement('input');
 8    input.className = 'checkbox-input';
 9    input.type = 'checkbox';
10    input.checked = item.checked;
11    input.id = item.name;
12    input.name = item.name;
13    input.value = item.name;
14
15    const label = document.createElement('label');
16    label.htmlFor = input.id;
17    label.textContent = item.title;
18    label.title = item.description;
19
20    input.addEventListener('change', e => {
21      var checkboxes = document.querySelectorAll('input[type=checkbox]');
22      var selected = Array.from(checkboxes)
23        .filter(cb => cb.checked)
24        .map(cb => cb.value);
25      // Send a message to the extension with the array of selected items
26      vscode.postMessage({type: 'itemsSelected', selections: selected});
27    });
28
29    li.appendChild(input);
30    li.appendChild(label);
31    ul.appendChild(li);
32  }
33}
For the method containing this code to be invoked, it needs to listen for messages from VS Code. To do that, the Webview must use the acquireVsCodeApi method to get the API object. This should be treated as a singleton and only acquired one time.
 1(function () {
 2  // @ts-ignore
 3  const vscode = acquireVsCodeApi();
 4
 5  // Register to handle messages sent from the
 6  // extension to the Webview
 7  window.addEventListener('message', event => {
 8
 9    // Retrieve the message payload. The payload is
10    // a JSON object defined by the extension.
11    const message = event.data;
12
13    // Providing a `type` property allows the handler
14    // to process multiple message types and delegate
15    // additional data to the right methods.
16    switch (message.type) {
17
18      // The extension defines a type to indicate
19      // the list needs to be reloaded
20      case 'updateItems': {
21
22        // Call the method above, passing in
23        // the array of items.
24        updateItems(message.data);
25        break;
26      }
27
28      // An example of an additional message type
29      // for notifying the Webview that the current
30      // document is being closed.
31      case 'closeDocument': {
32        break;
33      }
34    }
35  });
36})();
With this code in mind, we just need to make sure we have a place in the HTML for the list of items. The tutorials show you the structure of the HTML and how to provide it from the extension. For my situation, I just needed to put a ul element in the body with the class selection-list. The updateItems method can then find the element and dynamically create its child list items:
1<body>
2  <ul class="selection-list"></ul>
3</body>
Over time, the code has evolved to highlight items that are referenced in the document but not part of the list of available tags or categories. Those items include a hyperlink to create the missing metadata. That link posts a message to the extension, which creates the file and opens it. Creating the file updates the list of available tags and categories, which then triggers the extension to update the Webview.
With this little bit of code, I now have an extension that can automatically update the tags and categories for my posts. It’s a small thing, but it saves me time and effort. With a little bit of JavaScript knowledge, you can extend VS Code to meet your needs. The possibilities are endless! Have fun creating your own extensions and Happy DevOping!