
In the last post I talked about how I use Tasks in Visual Studio Code to help me with my blogging and eliminate pain points. Like with most stories, that’s only part of the truth. One of the other ways I optimize my writing is by using VS Code extensions. The VS Code IDE can be extended with JavaScript (and in some cases, HTML). If there’s a behavior that you want to change or that is missing, there is an often an extension for that. I covered a few of my favorite blogging extensions in a previous post.
There are two pain points that Tasks didn’t completely solve for me:
- Validating the metadata
- Selecting tags and categories
Let’s start with the first one. The PowerShell script was a good start to validating the YAML metadata, but it isn’t tightly integrated into the editor experience. While I could run it in the background to improve that, the task would require a lot more work to identify the specific metadata property with the error. In addition, it doesn’t provide a way to quickly resolve the issue from within the editor.
I wanted to see if I could give improve the workflow. My ideal experience would be something that validates the metadata as the file changes, highlights properties with incorrect values, and logs issues to the problems pane. The solution to having the ideal experience required a custom extension.
Developing an extension
If you’ve never created an extension before, the
official documentation is a great place to start. You just need a NodeJS environment with NPM to get started. The quick start uses Yeomen to bootstrap a complete extension with a single CLI call: npx --package yo --package generator-code -- yo code. This starts a wizard that is for the most part self-explanatory. I always start with a few personal choices:
New Extension (TypeScript)as my extension type. I like having the additional error checking that TypeScript provides.esbuildas my bundler. I find it more compatible and configurable for my use cases thanwebpack.yarnas my package manager. It’s fast and doesn’t need a massivenode_modulesfolder to work.
With each prompt, you use the arrow keys to select your choice and Enter to confirm. Your selections will remain onscreen, making it easy to review what you’re creating. For example:
 1? What type of extension do you want to create? New Extension (TypeScript)
 2? What's the name of your extension? blogtools
 3? What's the identifier of your extension? blogtools
 4? What's the description of your extension?
 5? Initialize a git repository? Yes
 6? Which bundler to use? esbuild
 7? Which package manager to use?
 8  npm
 9❯ yarn
10  pnpm
At the end of the process, you will have a complete (albeit basic extension). It will be created in a folder that matches the name of the extension. In the example above, this would be blogtools. The folder structure will include settings for VS Code for testing and building, a quick start guide to get you started, a basic test case, and an esbuild.js configured for building and minifying the extension.
 1blogtools
 2├── CHANGELOG.md
 3├── esbuild.js
 4├── eslint.config.mjs
 5├── package.json
 6├── README.md
 7├── src
 8│   ├── extension.ts
 9│   └── test
10│       └── extension.test.ts
11├── tsconfig.json
12├── vsc-extension-quickstart.md
13├── .vscode
14│   ├── extensions.json
15│   ├── launch.json
16│   ├── settings.json
17│   └── tasks.json
18├── .vscodeignore
19├── .vscode-test.mjs
20├── yarn.lock
21└── .yarnrc
Metadata validation
VS Code does allow you to directly integrate into the overall process of parsing and validating a file. This is done through the Language Server Protocol. Extensions can implement a language server directly and they can proxy requests to existing language servers. This is not a trivial task, but it would allow an extension to take advantage of the existing language servers. Unfortunately, implementing that requires a bigger time commit, and I timebox my projects.
I decided to use a simpler but less efficient solution. The extension would listen for changes to the file (or which file was being edited). If it was a Markdown file, it would read the content, parse the YAML metadata, and validate it against my schema. The method is similar to the PowerShell script, but implemented in JavaScript and able to more directly interact with the IDE.
To make this work, I added three packages to the project using yarn add:
ajv- Supports parsing and validating against JSON schema.
ajv-formats- Adds support for the latest JSON schema formats (since my schema uses the 2020 definition).
yaml- After I extract the YAML metadata from the file, this lets me parse it into a JavaScript object. I can then validate the object against the schema.
I then updated the extension.ts file’s activate() function. This is the method that is called when the extension is being activated. It is used to initialize its behaviors and register for events. I added listeners for changes to the document or active text editor. I wanted to listen to document changes so that it can annotate the issues as I type in the editor. By responding to changes to the active editor, I can evaluate the currently selected file if I’m switching between tabs. The listener code then calls a custom function to validate the file:
1context.subscriptions.push(
2    vscode.window.onDidChangeActiveTextEditor(async (editor) => {
3        await evaluateActiveSchema(editor?.document);
4    })
5);
6context.subscriptions.push(
7    vscode.window.onDidChangeTextDocument(evaluateActiveSchema)
8);
Why does the extension push the function like this? Because events hold references to resources, it can lead to performance and memory issues if the plugin can’t clean up after itself. VS Code provides this subscription model and allows us to push disposable resources into it. When the extension is deactivated, VS Code will automatically dispose of these resources.
The evaluateActiveSchema function does the real work. This function is responsible for parsing the YAML front matter from the Markdown and validating it. To avoid errors, it checks whether it received a document instance. If it did, it verifies that the document is a Markdown file before processing it. An initial stub for the functionality looked like this:
 1async function evaluateActiveSchema(doc: vscode.TextDocument | undefined) {
 2    if (doc && doc.languageId === 'markdown') {
 3        const metadata = extractMetadata(doc.getText());
 4        if (metadata) {
 5            const schema = await getSchema(metadata);
 6            const errors = await validateMetadata(doc, schema, metadata);
 7            logErrors(errors);
 8        }
 9    }
10}
From there, I began to implement the necessary code to parse and validate the metadata. As I did, this let to me refining the method and the logic to make it easier to also identify the specific ranges of the document that were impacted. As I find new cases, I refine the logic (incremental improvements). When it makes sense, I refactor the code to make it easier to test and maintain. For those of you trying to implement something similar, the rough parsing logic looked like this:
 1import Ajv2020, { ErrorObject } from 'ajv/dist/2020';
 2import addFormats from "ajv-formats";
 3import { parse } from 'yaml';
 4import * as posix from 'node:path';
 5
 6// Find the '---' delimited metadata (don't forget to handle errors!)
 7const metadataYaml = getMetadata(doc.getText());
 8
 9// Find the reference to the schema file in a comment
10const schemaPath = getSchemaPath(metadataYaml);
11
12// Use the yaml package to parse the metadata into a JavaScript object
13const metadata = parse(metadataYaml);
14
15// Create a validator for the 2020 JSON schema and call addFormats
16// to enable AJV to validate against that version of the specification.
17const ajv = new Ajv2020();
18addFormats(ajv);
19
20// Build the path to the associated schema file. There is some
21// logic required to handle extracting the schemaPath from the comment
22// in the front matter.
23const resolvedSchema = posix.resolve(
24  posix.join(posix.dirname(doc.fileName), schemaPath)
25);
26
27// Convert the path to a VS Code URI so that we can open the
28// file using VS Code APIs.
29const targetUri = vscode.Uri.file(resolvedSchema);
30
31try {
32    // Load the schema file. This will throw an error if the file
33    // does not exist.
34    const schemaContent = await vscode.workspace.fs.readFile(targetUri);
35
36    // Parse the JSON content of the schema file and create an
37    // object from it.
38    const schema = JSON.parse(Buffer.from(schemaContent).toString('utf8'));
39
40    // Compile the schema object. This returns a function that
41    // can validate the metadata
42    const validate = ajv.compile(schema);
43
44    // Validate the metadata (AJV returns false if there are errors)
45    if (!validate(metadata)) {
46        return validate.errors?.map(
47            //... logic to convert each ErrorObject instance
48            // to vscode.Diagnostic instances. Make sure to clear the
49            // existing diagnostics for the document before adding
50            // new ones to avoid duplicates.
51        );
52    }
53}
54// ... More code, including logic for handling invalid
55// any missing schema files or exceptions raised by the compiler
Not nearly as elegant as a pass-through language server, but definitely much easier to put together quickly! Hopefully one day the markdown language server is updated to pass-through embedded front matter. Until then, this solves my problem.
Displaying the errors
From there, the you can use a
DiagnosticsCollection to make the errors visible and associate them with the file. A DiagnosticsCollection is simply a logical structure for grouping together items to be displayed on the Problems pane. It is specific to the extension that created it and managed as part of the lifecycle. To create a collection for those messages, use the activate method:
1const diagnosticCollection = vscode.languages.createDiagnosticCollection(`${extensionId}Diagnostics`);
2context.subscriptions.push(diagnosticCollection);
To add the diagnostics to the collection, use the set method. This method takes the URI of the document to associate the diagnostics with and the array of diagnostics to display. The clear method is called to remove any previous results before adding the current list of issues.
1diagnosticCollection.clear();
2diagnosticCollection.set(doc.uri, diagnostics);
The individual Diagnostic instances can contain both the error message and a range of the document that contains the error. The TextDocument instance contains a helper method that can convert an offset into the text into a Range for the diagnostic. If you know the offset to the text within the overall Markdown file, you can use the following code to create a Range:
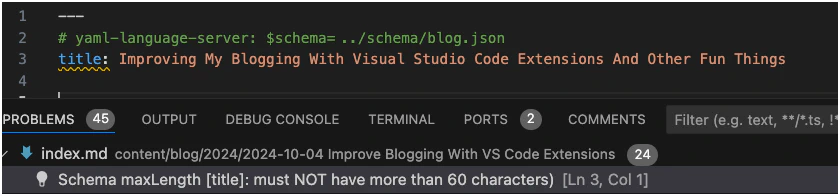
1const range = new vscode.Range(document.positionAt(start), document.positionAt(end));Providing a Range allows the IDE to highlight the specific text that is causing the error. It also allows you to jump directly to the error. I use this to highlight the particular property in the YAML that is failing validation. The code just looks for the index of the first line that starts with ${property}: in the front matter. The end is calculated by adding the length of the property name.
The end result looks like this:
The activation consideration
I mentioned that the logic for this is triggered by some events. There’s one more event to consider – activate. When the extension is activated, some criteria has been met for running your extension. This could be as complex as looking for specific paths in the workspace or as simple as triggering on the file language.
The activation event is specified in the package.json:
1"activationEvents": [
2    "onLanguage:markdown"
3  ],
The activate method is used for setting up and configuring the extension, and the deactivate method is provided for cleanup. Activation indicates something has happened that may need handling by the extension. In this case, triggering on the language of an open document. Since the current document in the editor is a Markdown file, the method needs to also trigger the evaluation of the current document. Otherwise, it will only be triggered when the document is changed or we switch between document tabs.
1await evaluateActiveSchema(vscode.window.activeTextEditor?.document);If the active editor cannot be retrieved or there is no longer a document open when the method activates, the method will receive an undefined value. This is part of why that method checks the document is not undefined and is a Markdown file before processing it. It handles the cases where something changed while we were activating. It also ensures that we have a valid document before we process it.
Extending the extensions
Implementing this code allowed me to replace the script task with something that is more closely integrated into the IDE experience. In addition, it’s continuously monitoring the file to let me know if I have any mistakes in the metadata. This helps to ensure that there are no issues when publishing the post. Because the processing code itself is ultimately just JavaScript, I could also do some light refactoring to enable me to run the code as a Node script in the CI pipeline.
This still leaves us with one more pain point to resolve. I’ll cover that in the next post.